Capturing a Scene
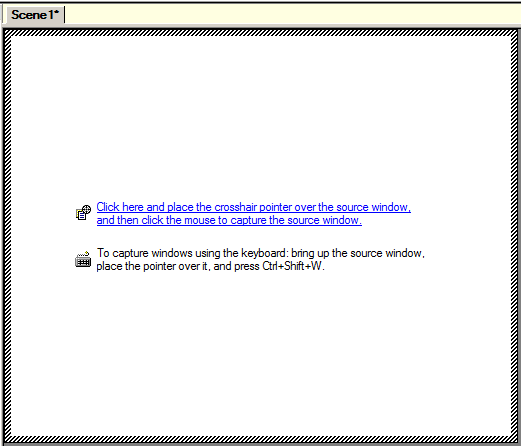
A scene specifies a target application source window with which the Real-Time Designer project will interact. A default blank scene called Scene1 automatically appears in each Real-Time Designer project, showing links for two of the methods available for capturing a scene.
In a set of referenced projects, ensure that this default scene appears in the main project, or the full solution will not run.
There are three main methods for capturing a scene:
When you capture a scene, the Real-Time Designer discovers the essential interactions of each object (window, control, and so on) with the operating system. It then creates an anchor called SceneAnchor to store the window's identification parameters, as described in Scene Composer Identification Process.
You can control the identification process by modifying the properties of the SceneAnchor anchor, as described in Using Anchors. For more information about identification parameters, see Defining Identification Parameters.
Scene Composer Identification Process
When you create a scene by capturing the source window of an application, the Real-Time Designer decodes the captured window to discover the essential interactions of each object (window, control, and so on) with the operating system. It creates an anchor called SceneAnchor, and stores the specific parameters of the captured window as anchor properties.
During the scene identification process, the Real-Time Designer gets the same set of identification parameters from all the windows on the desktop. It compares the sets obtained with the identification parameters stored for the source window, and checks if a match. After a match is found, the Real-Time Client checks for additional anchors for each control in the scene.
As you can see, for the scene to work successfully, you must define sufficient identification parameters to uniquely and unambiguously identify the captured scene within all the windows on the desktop. You can control the identification of the source window by modifying the properties of the SceneAnchor, as described in Using Anchors.
Capturing a Scene Using the Cursor
Capturing a scene using the cursor is similar to capturing a single control in the Physical Objects module.
To capture a scene using the cursor:
-
In the Scene work area, click the top link in the default scene.
The Real-Time Designer is minimized and the cursor takes the following form:
 .
. -
Position the cursor over the source window in the target application.
-
Click to capture the identified window as the source window. You can click anywhere in the source window to capture it.
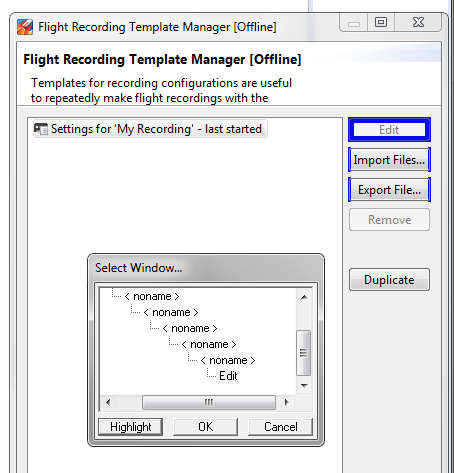
To capture a specific element in the window hierarchy, press Ctrl on the keyboard when you click to capture. In the Select Window... window, you can choose which element to capture. To see which areas can be captured, select an element in the hierarchy and click Highlight. To capture the selected element, click OK.
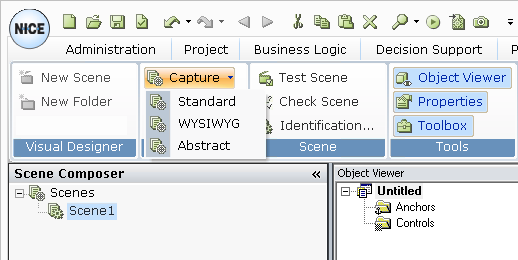
Capturing a Scene Using the Capture Menu
Capturing a scene using the Capture menu enables you to select the capture option that is most applicable for the application you want to capture. This option for capturing a scene is similar to capturing a single control in the Physical Objects module.
The data captured during runtime is the same, regardless of the capture option you use.
To capture a scene using the Capture menu:
-
From the Scene Composer tab ribbon, click Capture and select one of the capture options.
-
Standard: A mixed technique combining WYSIWYG and Abstract, which is usable for most applications. This is the default mode
-
WYSIWYG: A screenshot (bitmap) of the source scene appears in the Scene work area.
-
Abstract: The captured window is painted in exactly the same way as the source window in the target application. This means that the same window operations that are used to build the source window are used in the Scene Composer
Real-Time Designer is minimized and the cursor changes to
 .
. -
-
Position the cursor over the source window in the target application.
-
Click to capture the identified window.
Press Ctrl on the keyboard when you click to capture. In the Select Window... window, you can choose which element in the window hierarchy to capture. To see which areas can be captured, click an element in the hierarchy and click Highlight. To capture the selected element, click OK.
In the example below, the Edit button is highlighted before being captured.
Capturing a Scene Using the Keyboard
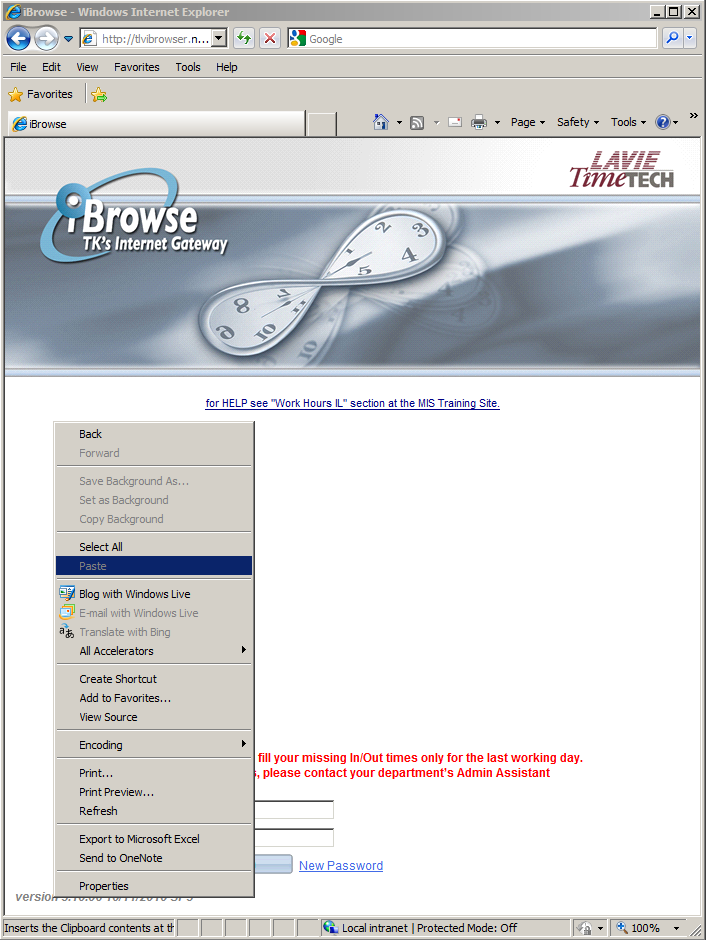
Capture a scene using the keyboard when the Capturing Using the Cursor option is not available, such as when working with pop-up windows, drop-down menus, or right-click menus, which automatically close when you click anywhere in the Real-Time Designer window. The keyboard option for capturing a scene enables you to capture these pop-up windows and menus.
To capture a scene using the keyboard:
-
Open the source window in the target application that is to be the source window for the scene. For this example, the drop-down menu in the window below is the source for the scene.
-
Position the pointer anywhere over the source window and then press Ctrl+Shift+W to capture the drop-down menu.
